Understanding Headlight Deterioration
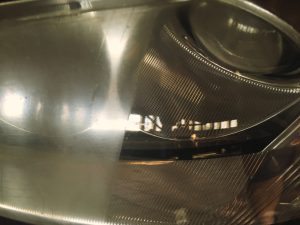
The deterioration of modern plastic headlights is primarily caused by exposure to ultraviolet (UV) light from the sun, which leads to oxidation and yellowing. There are a few types of deterioration:
- Yellowing of the lens: This is more of a cosmetic look but does diminish the light to some degree. The longer you wait to rejuvenate the deeper that yellow can go, making it harder to improve.
- Clouding: The lens becomes less clear over time and has a cloudy look.
- De-lamination: Usually the lens will become cloudy or yellow before it gets to the point of de lamination. The top layer looks like it wants to peel.
- Cracking: Some headlights will break down and you can see small cracks, micro cracks throughout the lens. This problem can be “somewhat” fixed but if it is too severe, replacement will be the option.
Materials Needed:
- Automotive headlight restoration kit or individual components such as sandpaper (various grits), polishing compound, and UV sealant.
- Masking Tape
- Water spray bottle
- Protective gloves and safety glasses
- Microfiber cloths
Preparing the Headlights:
3. Sanding the Headlights
Depending on how bad the surface is , you may start with 800 to 1000 grit paper. The best way to wet sand is with a water hose so that you keep a constant flow of water over the surface. What this does is clean the sandpaper faster and you won’t get any buildup on it. It also keeps any dirt constantly off.
 After you have removed the bulk or material off that is bad, step down to a finer grit sandpaper. You will want to end up with 2000 or higher grit paper. The finer you go, the less polishing you will have to do.
You can stop and dry the surface off to get a better look at the progress you’ve made. Keep in mind , when the headlight is wet, that will be a good indication what it will look like after they are polished. Once you have removed the deterioration to your liking, it’s time to polish them.
Polishing the Headlights
This can be done by hand with a microfiber cloth and compound. However, it is much easier to do it with an air or electric buffer. The plastic they use for headlights is very thick so you really don’t need to worry about putting too much pressure on it. 
It is best to use a medium to heavy compound at first. Most grades of buffing pads will work, a wool pad will be most aggressive. The foam pads may take a bit longer but buff it until you get a clear finish.
Applying UV Sealant
A UV sealant plays a crucial role in protecting your headlights from future oxidation and yellowing. Headlight lenses are made from polycarbonate plastic, which is strong but susceptible to UV damage. Exposure to sunlight can cause the plastic to oxidize and turn cloudy or yellow over time. A UV sealant forms a protective barrier on the surface, blocking harmful ultraviolet rays and preventing this type of deterioration.
The kits you buy should come with some sort of sealant, best to apply per their instructions. If you don’t use a kit, you can use a good wax which may require more applications on a regular basis.
The best UV sealant is none other than automotive clearcoat.
BUT, this would be for a body shop to apply unless you have access to spray gun accessories. Yes this can be done with spray can clear, however, the quality of those products is not as good due to the fact it is not catalyzed.
If this process is the process you choose, it can be applied directly after the wet sanding process.