
Mastering the Art of Painting Plastic Car Parts:
Painting plastic car parts can be a tricky endeavor, requiring specific techniques to ensure a durable and attractive finish. This article will guide you through a straightforward, step-by-step process, from preparation to the final touches.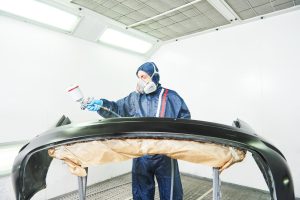
It will help you achieve a professional-looking paint job that revitalizes your vehicle’s appearance. Whether you’re aiming for a fresh look or restoring worn parts, these tips will ensure a flawless result that stands the test of time.
Step 1: Preparation
Cleaning the Plastic Parts
The most common part is plastic bumpers, and we are talking about new parts that have not been painted before. Begin by thoroughly cleaning the plastic parts to remove all traces of dirt, grease, and wax. Use a mild detergent mixed with water, dishwashing soap works well.
Use a cloth or for better results, use a fine-grade scotch-brite pad. Some plastics are softer than others so make sure the scratch pad is not too course which will make deep scratches. Rinse the parts well with clean water and dry them completely with a microfiber towel or force air dry to prevent water spots.
Plastic parts are formed in a mold so many times they will still have a mold release agent still on the surface. It is very important to get this off in the cleaning process.
Sanding
When preparing plastic for paint, it’s crucial to understand the difference between a mechanical bond and a chemical bond:
Mechanical Bond:
- This bond is created when the surface of the plastic is physically roughened through sanding. The fine scratches and grooves created by sanding provide a textured surface that paint can cling to, similar to how Velcro works.
- This physical interlocking between the paint and the surface is what forms a mechanical bond. It’s essential for paint adhesion, especially on non-porous surfaces like plastic.
Chemical Bond:
A chemical bond, on the other hand, occurs when the paint chemically reacts with the surface of the plastic, creating a bond at the molecular level. This type of bond can be achieved through the use of specialized primers and paints designed for plastic. These products often contain chemicals that can etch into the plastic surface or are formulated to chemically interact with the plastic, ensuring a stronger and more durable bond than a mechanical bond alone.
For optimal paint adhesion on plastic parts, it’s generally recommended to create both a mechanical bond through sanding and a chemical bond through the use of appropriate primers and paints. This dual approach ensures that the paint adheres well to the surface and is less likely to peel or flake off over time.
What grit sandpaper do I use?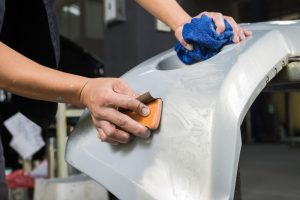
It is important to identify how soft the plastic is. Try a small area to see if the paper is leaving too heavy of a scratch, if you can feel the roughness with your hand, it is way too much. As stated above, washing with a fine scratch pad and soap is usually enough, the surface will look dull when dry. It you choose to use sandpaper, 500 grit or higher is recommended. Water sanding is the best method , which we will cover in another article.
Step 2: Priming
Importance of Priming:
Priming is crucial for plastic parts as it provides a surface that the paint can adhere to more effectively. It acts as a bridge between the plastic and the paint, ensuring better adhesion and a smoother finish.
Choosing the Right Primer: Select a primer specifically formulated for plastic surfaces. These primers contain special additives that enhance their bonding capabilities with plastic, creating a strong foundation for the paint. Look for products labeled as “plastic primer” or “adhesion promoter.” They are generally a clear liquid form.
Application Tips:
- Apply the primer in light, even coats to avoid drips or runs.
- Hold the spray can about 6-8 inches away from the surface and use a sweeping motion to cover the area uniformly.
- Allow the primer to dry according to the manufacturer’s instructions before applying the paint. Avoid sanding the primer, these primers are designed to be non-sanding.
Step 3: Painting
- In this modern day’s technology, the base paint used for plastic is not any different that for metal or previously painted parts.
- It used to be recommended to add a “flex” additive to the clear coat or paint if non clear paint is used. However, the final coat these days is plenty flexible on it’s own.
- Paint as per manufactures recommendation on number of coats, dry time in between, etc.
Buffing:
After the finish is dry, you can color sand to buff if desired to remove any imperfections. Buffing details will be discussed in another article.
Painting plastic car parts requires careful preparation, the right materials, and attention to detail. By following the steps outlined in this guide, you can ensure a smooth, durable finish that enhances the appearance of your vehicle.
Remember to start with a clean, well-prepped surface, choose the appropriate primer and paint for plastic, and apply each layer with patience and precision. With these tips in mind, you’re well-equipped to tackle your next automotive painting project and achieve professional-looking results that will make your car stand out on the road.