Ever found yourself puzzled over the secret to achieving that flawless finish on your car’s bodywork?
The answer might just lie in a tool you’ve yet to fully appreciate: the dual-action sander.
The dual-action sander, often referred to as a DA sander, is a cornerstone in any professional auto body shop.
Let’s explore the ins and outs of this indispensable tool, ensuring your next auto body project shines with professional quality.
 What Is a Dual-Action Sander?
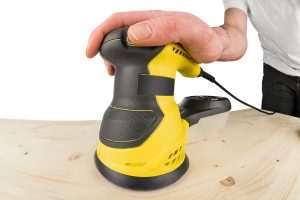
A dual-action sander, or DA sander for short, is a powerful tool engineered to offer a combination of rotary and orbital action.
This means that while the sanding disc spins in a circular motion, it also moves in an orbit or ellipse, creating a random pattern of sanding.
This dual motion is the secret sauce behind its effectiveness, especially in auto body work where precision is key.
The dual-action sander is a must-have for anyone serious about achieving professional-grade finishes in their auto body work or DIY projects.
Its design ensures a smooth, flawless finish every time, making it a favorite among professionals and hobbyists alike.
The Mechanics Behind the Magic
What sets the DA sander apart from other sanders is not just its unique motion but also its adaptability.
With adjustable speed settings and the ability to use various types of sanding pads, this tool can be tailored to suit a wide range of materials and finishes.
Let’s break down this magic into simpler terms to understand how it all works.
The Dual Motion
The DA sander’s motor powers a spindle that moves in two distinct patterns: it rotates in a circular motion and oscillates in an orbit.
This dual-action mechanism is what prevents the creation of swirl marks, as the sanding pad does not follow the same path twice.
Instead, it sands in a random pattern, ensuring a uniformly smooth surface without gouging or scratching.
Key Components
- Motor: This is the powerhouse of the sander, driving the spindle’s rotations and oscillations. Its power can vary, affecting the sander’s speed and efficiency.
- Backing Plate: Attached to the motor’s spindle, this plate supports the sanding pad. It’s pivotal for transferring the motor’s dual motion to the pad.
- Sanding Pad: This is where the sandpaper attaches. Available in various grits, the pad directly contacts the work surface, executing the actual sanding.
Adjustable Speed Settings
Most DA sanders come with adjustable speed settings, allowing the user to control the intensity of the sanding action.
This adaptability makes the DA sander suitable for a range of tasks, from removing old paint to applying a fine finish.
Types of Dual-Action Sanders
You’ll encounter two primary types of dual-action sanders, each powered differently and suited to specific tasks and environments.
Understanding these variations is key to selecting the right tool for your needs.
Electric Dual-Action Sanders
Electric DA sanders are the most accessible for hobbyists and DIY enthusiasts, powered by standard electrical outlets.
Their main advantages include a consistent power supply and the elimination of the need for an air compressor, making them convenient and ready to use in a variety of settings.
However, they tend to be heavier due to the motor, and their performance might not match the high power output of pneumatic models.
Pneumatic Dual-Action Sanders
Pneumatic DA sanders require an air compressor to operate but are preferred in professional auto body shops for their lighter weight and superior power efficiency.
These models offer high performance with less heat generation during operation, ideal for prolonged use on complex projects.
The need for an air compressor, though, can add to the overall cost and limit portability.
Choosing Between Electric and Pneumatic
The choice between electric and pneumatic dual-action sanders hinges on your specific needs:
For home use and occasional projects, electric DA sanders offer convenience and ease of use without the additional investment in an air compressor.
For professional or frequent use, especially in auto body work, a pneumatic DA sander provides the durability, performance, and longevity required for demanding tasks.
Both types of dual-action sanders have their place in the workshop, each bringing distinct advantages.
Consider your project requirements, workspace, and budget when choosing the right DA sander for your needs.
Why Use a Dual-Action Sander in Auto Body Work?
The dual-action sander is an indispensable tool in auto body work for several reasons.
Its design and functionality cater to the precision and finesse required in preparing and finishing vehicle surfaces.
Here’s why it stands out:
Precision and Finish
The DA sander’s unique combination of rotary and orbital movements ensures a smooth, even finish free from swirl marks.
This is crucial in auto body work, where the quality of the surface directly impacts the final appearance of the paint job.
By minimizing surface imperfections, it lays the perfect foundation for paint application.
Versatility
With the ability to adjust speed settings and switch between various sanding pads, DA sanders adapt to a wide range of tasks.
From stripping old paint to smoothing out body filler or applying a final polish, this tool can handle different stages of the bodywork process, making it a versatile addition to any toolkit.
Efficiency
The dual-action mechanism allows for more efficient material removal with less risk of damaging the work surface.
This efficiency saves time and effort in the preparation phase, allowing for quicker progression to painting and finishing.
Safety for the Surface
Traditional sanders can easily dig into or burn the work surface if not handled with extreme care.
The DA sander’s design significantly reduces these risks, offering a safer alternative that is less likely to cause inadvertent damage to the vehicle’s body.
User-Friendly
For professionals and enthusiasts alike, the DA sander is user-friendly, with its lightweight design (especially the pneumatic models) reducing fatigue during extended use.
This accessibility makes it an attractive option for both seasoned experts and those new to auto body repair.
The dual-action sander is a game-changer in auto body work.
Its ability to deliver a superior finish efficiently and safely makes it a tool that professionals and DIY enthusiasts alike should not overlook.
Choosing the Right Dual-Action Sander
The best dual-action sander for you depends on your specific needs, including the types of projects you tackle, your workspace limitations, and your budget.
Here are 5 keys to choosing the right dual-action sander:
Power Source
- Electric DA Sanders: Ideal for hobbyists or those without access to an air compressor. Look for models with adequate power to handle your typical projects.
- Pneumatic DA Sanders: Preferred for professional auto body shops due to their lightweight design and high performance. Ensure you have a compatible air compressor.
Consider a DA sander with adjustable speed settings, although most should have that included.
This feature allows for greater control over the sanding process, enabling you to tailor the tool’s performance to the task at hand, from heavy material removal to fine finishing.
Size and Weight
A sander’s size and weight impact its maneuverability and the fatigue you experience during use.
Lighter models are preferable for prolonged use, but they should not compromise on the power and durability needed for your projects.
Sanding Pad Size
DA sanders come with various sanding pad sizes, typically ranging from 5 to 6 inches, and 3 inch is great for small areas or hard to reach areas.
Larger pads cover more area but may not fit tight spaces.
Consider the types of projects you undertake most often when choosing pad size.
Ergonomics and Comfort
Ergonomic design and features like vibration reduction are critical for comfort, especially during extended use.
A comfortable grip and ease of operation can significantly enhance your work experience.
Here are 5 dual-action sanders we recommend:
- Dewalt 20V Max Orbital Sander
- Dynabrade 56826 Dynorbital-Spirit Non-Vacuum Random Orbital Sander
- Mirka DEROS 650CV 6-Inch Random Orbital Sander
- Chicago Pneumatic CP7255 Random Orbital Sander
- Astro Pneumatic Tool 300SP 6-Inch DAQ Random Orbital Sander
If you want full in-depth recommendations on the best dual-action sander check out our article “7 Best Dual-Action Sanders for Auto Body Work“.
Best Practices for Using a Dual-Action Sander
These guidelines ensure not only the quality of your finish but also the longevity and performance of your tool.
Proper Preparation
- Surface Cleaning: Before sanding, thoroughly clean the surface to remove dirt, grease, or any contaminants that could affect sanding efficiency.
- Correct Sandpaper Grit: Choose the appropriate sandpaper grit for your task. Start with a coarser grit for removing material and gradually move to finer grits for smoothing and finishing.
Optimal Technique
- Even Pressure: Apply consistent, light pressure to avoid gouging the surface. Let the sander do the work.
- Movement: Keep the sander moving in a controlled, overlapping pattern to ensure even sanding without spending too much time on one spot.
- Speed Settings: Utilize adjustable speed settings to match the task at hand, starting slow for precision work and increasing speed for material removal.
Safety Measures
- Protective Gear: Always wear safety glasses, dust masks, and ear protection to safeguard against dust, debris, and noise.
- Awareness of Surroundings: Keep the cord or air hose away from the sanding area to prevent entanglement or damage.
Maintenance - Regular Cleaning: Clean the sander after each use to prevent dust build-up, which can affect performance and longevity.
- Check for Wear: Regularly inspect sanding pads and replace them when worn to maintain efficiency.
- Lubrication: For pneumatic models, ensure proper lubrication according to the manufacturer’s instructions.
Storing
Store the sander in a clean, dry place to prevent rust or damage. Proper storage extends the tool’s life and ensures it’s ready for your next project.
Maintenance and Care
To ensure your dual-action sander remains a reliable asset in your auto body work toolkit, regular maintenance, and proper care are essential.
Here’s how to keep your DA sander in peak condition:
Routine Cleaning
- After each use, remove dust and debris from the sander. A clean tool prevents material build-up that can impair functionality and longevity.
- Pay special attention to the vent areas and sanding pad, using compressed air or a brush to clear away particles.
Inspection and Replacement
- Regularly inspect the sanding pad for wear and tear. A worn pad can reduce efficiency and even damage the surface you’re working on.
- Check for loose or damaged parts, including the power cord or air hose connections, and address any issues promptly to ensure safety and performance.
Lubrication
- For pneumatic DA sanders, apply the recommended lubrication to the air inlet periodically to keep internal components running smoothly.
- Follow the manufacturer’s guidance on lubrication intervals and products to avoid over-lubricating or using incompatible substances.
Proper Storage
- Store your DA sander in a clean, dry place to protect it from moisture and dust. This helps prevent rust and keeps the tool ready for use.
- Avoid storing the sander with pressure on the sanding pad or backing plate to prevent deformation.
Handling and Use
- Use the sander as intended, avoiding tasks that exceed its design capabilities. Misuse can lead to premature wear or damage.
- Handle the tool with care, avoiding drops or impacts that can harm internal components or the casing.
